DAG Creation and Submission
Launch this tutorial in a Jupyter Notebook on Binder: ![]()
In this tutorial, we will learn how to use htcondor.dags to create and submit an HTCondor DAGMan workflow. Our goal will be to create an image of the Mandelbrot set. This is a perfect problem for high-throughput computing because each point in the image can be calculated completely independently of any other point, so we are free to divide the image creation up into patches, each created by a single HTCondor job. DAGMan will enter the picture to coordinate stitching the image patches we
create back into a single image.
Making a Mandelbrot set image locally
We’ll use goatbrot (https://github.com/beejjorgensen/goatbrot) to make the image. goatbrot can be run from the command line, and takes a series of options to specify which part of the Mandelbrot set to draw, as well as the properties of the image itself.
goatbrot options:
-i 1000The number of iterations.-c 0,0The center point of the image region.-w 3The width of the image region.-s 1000,1000The pixel dimensions of the image.-o test.ppmThe name of the output file to generate.
We can run a shell command from Jupyter by prefixing it with a !:
[1]:
! ./goatbrot -i 10 -c 0,0 -w 3 -s 500,500 -o test.ppm
! convert test.ppm test.png
Complex image:
            Center: 0 + 0i
             Width: 3
            Height: 3
        Upper Left: -1.5 + 1.5i
       Lower Right: 1.5 + -1.5i

Output image:
          Filename: test.ppm
     Width, Height: 500, 500
             Theme: beej
       Antialiased: no

Mandelbrot:
    Max Iterations: 10
        Continuous: no

Goatbrot:
    Multithreading: not supported in this build

Completed: 100.0%
Let’s take a look at the test image. It won’t be very good, because we didn’t run for very many iterations. We’ll use HTCondor to produce a better image!
[2]:
from IPython.display import Image

Image('test.png')
[2]:
What is the workflow?
We can parallelize this calculation by drawing rectangular sub-regions of the full region (“tiles”) we want and stitching them together into a single image using montage. Let’s draw this out as a graph, showing how data (image patches) will flow through the system. (Don’t worry about this code, unless you want to know how to make dot diagrams in Python!)
[3]:
from graphviz import Digraph
import itertools

num_tiles_per_side = 2

dot = Digraph()

dot.node('montage')
for x, y in itertools.product(range(num_tiles_per_side), repeat = 2):
    n = f'tile_{x}-{y}'
    dot.node(n)
    dot.edge(n, 'montage')

dot
[3]:

Since we can chop the image up however we’d like, we have as many tiles per side as we’d like (try changing num_tiles_per_side above). The “shape” of the DAG is the same: there is a “layer” of goatbrot jobs that calculate tiles, which all feed into montage. Now that we know the structure of the problem, we can start describing it to HTCondor.
Describing goatbrot as an HTCondor job
We describe a job using a Submit object. It corresponds to the submit file used by the command line tools. It mostly behaves like a standard Python dictionary, where the keys and values correspond to submit descriptors.
[4]:
import htcondor2 as htcondor

tile_description = htcondor.Submit(
    executable = 'goatbrot',  # the program we want to run
    arguments = '-i 10000 -c $(x),$(y) -w $(w) -s 500,500 -o tile_$(tile_x)-$(tile_y).ppm',  # the arguments to pass to the executable
    log = 'mandelbrot.log',  # the HTCondor job event log
    output = 'goatbrot.out.$(tile_x)_$(tile_y)',  # stdout from the job goes here
    error = 'goatbrot.err.$(tile_x)_$(tile_y)',   # stderr from the job goes here
    request_cpus = '1',        # resource requests; we don't need much per job for this problem
    request_memory = '128MB',
    request_disk = '1GB',
)

print(tile_description)
executable = goatbrot
arguments = -i 10000 -c $(x),$(y) -w $(w) -s 500,500 -o tile_$(tile_x)-$(tile_y).ppm
log = mandelbrot.log
output = goatbrot.out.$(tile_x)_$(tile_y)
error = goatbrot.err.$(tile_x)_$(tile_y)
request_cpus = 1
request_memory = 128MB
request_disk = 1GB
queue
Notice the heavy use of macros like $(x) to specify the tile. Those aren’t built-in submit macros; instead, we will plan on passing their values in through vars. Vars will let us customize each individual job in the tile layer by filling in those macros individually. Each job will recieve a dictionary of macro values; our next goal is to make a list of those dictionaries.
We will do this using a function that takes the number of tiles per side as an argument. As mentioned above, the structure of the DAG is the same no matter how “wide” the tile layer is. This is why we define a function to produce the tile vars instead of just calculating them once: we can vary the width of the DAG by passing different arguments to make_tile_vars. More customizations could be applied to make different images (for example, you could make it possible to set the center point
of the image).
[5]:
def make_tile_vars(num_tiles_per_side, width = 3):
    width_per_tile = width / num_tiles_per_side

    centers = [
        width_per_tile * (n + 0.5 - (num_tiles_per_side / 2))
        for n in range(num_tiles_per_side)
    ]

    vars = []
    for (tile_y, y), (tile_x, x) in itertools.product(enumerate(centers), repeat = 2):
        var = dict(
            w = width_per_tile,
            x = x,
            y = -y,  # image coordinates vs. Cartesian coordinates
            tile_x = str(tile_x).rjust(5, '0'),
            tile_y = str(tile_y).rjust(5, '0'),
        )

        vars.append(var)

    return vars
[6]:
tile_vars = make_tile_vars(2)
for var in tile_vars:
    print(var)
{'w': 1.5, 'x': -0.75, 'y': 0.75, 'tile_x': '00000', 'tile_y': '00000'}
{'w': 1.5, 'x': 0.75, 'y': 0.75, 'tile_x': '00001', 'tile_y': '00000'}
{'w': 1.5, 'x': -0.75, 'y': -0.75, 'tile_x': '00000', 'tile_y': '00001'}
{'w': 1.5, 'x': 0.75, 'y': -0.75, 'tile_x': '00001', 'tile_y': '00001'}
If we want to increase the number of tiles per side, we just pass in a larger number. Because the tile_description is parameterized in terms of these variables, it will work the same way no matter what we pass in as vars.
[7]:
tile_vars = make_tile_vars(4)
for var in tile_vars:
    print(var)
{'w': 0.75, 'x': -1.125, 'y': 1.125, 'tile_x': '00000', 'tile_y': '00000'}
{'w': 0.75, 'x': -0.375, 'y': 1.125, 'tile_x': '00001', 'tile_y': '00000'}
{'w': 0.75, 'x': 0.375, 'y': 1.125, 'tile_x': '00002', 'tile_y': '00000'}
{'w': 0.75, 'x': 1.125, 'y': 1.125, 'tile_x': '00003', 'tile_y': '00000'}
{'w': 0.75, 'x': -1.125, 'y': 0.375, 'tile_x': '00000', 'tile_y': '00001'}
{'w': 0.75, 'x': -0.375, 'y': 0.375, 'tile_x': '00001', 'tile_y': '00001'}
{'w': 0.75, 'x': 0.375, 'y': 0.375, 'tile_x': '00002', 'tile_y': '00001'}
{'w': 0.75, 'x': 1.125, 'y': 0.375, 'tile_x': '00003', 'tile_y': '00001'}
{'w': 0.75, 'x': -1.125, 'y': -0.375, 'tile_x': '00000', 'tile_y': '00002'}
{'w': 0.75, 'x': -0.375, 'y': -0.375, 'tile_x': '00001', 'tile_y': '00002'}
{'w': 0.75, 'x': 0.375, 'y': -0.375, 'tile_x': '00002', 'tile_y': '00002'}
{'w': 0.75, 'x': 1.125, 'y': -0.375, 'tile_x': '00003', 'tile_y': '00002'}
{'w': 0.75, 'x': -1.125, 'y': -1.125, 'tile_x': '00000', 'tile_y': '00003'}
{'w': 0.75, 'x': -0.375, 'y': -1.125, 'tile_x': '00001', 'tile_y': '00003'}
{'w': 0.75, 'x': 0.375, 'y': -1.125, 'tile_x': '00002', 'tile_y': '00003'}
{'w': 0.75, 'x': 1.125, 'y': -1.125, 'tile_x': '00003', 'tile_y': '00003'}
Describing montage as an HTCondor job
Now we can write the montage job description. The problem is that the arguments and input files depend on how many tiles we have, which we don’t know ahead-of-time. We’ll take the brute-force approach of just writing a function that takes the tile vars we made in the previous section and using them to build the montage job description.
Not that some of the work of building up the submit description is done in Python. This is a major advantage of communicating with HTCondor via Python: you can do the hard work in Python instead of in submit language!
One area for possible improvement here is to remove the duplication of the format of the input file names, which is repeated here from when it was first used in the goatbrot submit object. When building a larger, more complicated workflow, it is important to reduce duplication of information to make it easier to modify the workflow in the future.
[8]:
def make_montage_description(tile_vars):
    num_tiles_per_side = int(len(tile_vars) ** .5)

    input_files = [f'tile_{d["tile_x"]}-{d["tile_y"]}.ppm' for d in tile_vars]

    return htcondor.Submit(
        executable = '/usr/bin/montage',
        arguments = f'{" ".join(input_files)} -mode Concatenate -tile {num_tiles_per_side}x{num_tiles_per_side} mandelbrot.png',
        transfer_input_files = ', '.join(input_files),
        log = 'mandelbrot.log',
        output = 'montage.out',
        error = 'montage.err',
        request_cpus = '1',
        request_memory = '128MB',
        request_disk = '1GB',
    )
[9]:
montage_description = make_montage_description(make_tile_vars(2))

print(montage_description)
executable = /usr/bin/montage
arguments = tile_00000-00000.ppm tile_00001-00000.ppm tile_00000-00001.ppm tile_00001-00001.ppm -mode Concatenate -tile 2x2 mandelbrot.png
transfer_input_files = tile_00000-00000.ppm, tile_00001-00000.ppm, tile_00000-00001.ppm, tile_00001-00001.ppm
log = mandelbrot.log
output = montage.out
error = montage.err
request_cpus = 1
request_memory = 128MB
request_disk = 1GB
queue
Describing the DAG using htcondor.dags
Now that we have the job descriptions, all we have to do is use htcondor.dags to tell DAGMan about the dependencies between them. htcondor.dags is a subpackage of the HTCondor Python bindings that lets you write DAG descriptions using a higher-level language than raw DAG description file syntax. Incidentally, it also lets you use Python to drive the creation process, increasing your flexibility.
Important Concept: the code from dag = dags.DAG() onwards only defines the topology (or structure) of the DAG. The tile layer can be flexibly grown or shrunk by adjusting the tile_vars without changing the topology, and this can be clearly expressed in the code. The tile_vars are driving the creation of the DAG. Try changing num_tiles_per_side to some other value!
[10]:
from htcondor2 import dags

num_tiles_per_side = 2

# create the tile vars early, since we need to pass them to multiple places later
tile_vars = make_tile_vars(num_tiles_per_side)

dag = dags.DAG()

# create the tile layer, passing in the submit description for a tile job and the tile vars
tile_layer = dag.layer(
    name = 'tile',
    submit_description = tile_description,
    vars = tile_vars,
)

# create the montage "layer" (it only has one job in it, so no need for vars)
# note that the submit description is created "on the fly"!
montage_layer = tile_layer.child_layer(
    name = 'montage',
    submit_description = make_montage_description(tile_vars),
)
We can get a textual description of the DAG structure by calling the describe method:
[11]:
print(dag.describe())
Type     Name   # Nodes  # Children  Parents
Layer    tile      4         1
Layer  montage     1         0       tile[ManyToMany]
Write the DAG to disk
We still need to write the DAG to disk to get DAGMan to work with it. We also need to move some files around so that the jobs know where to find them.
[12]:
from pathlib import Path
import shutil

dag_dir = (Path.cwd() / 'mandelbrot-dag').absolute()

# blow away any old files
shutil.rmtree(dag_dir, ignore_errors = True)

# make the magic happen!
dag_file = dags.write_dag(dag, dag_dir)

# the submit files are expecting goatbrot to be next to them, so copy it into the dag directory
shutil.copy2('goatbrot', dag_dir)

print(f'DAG directory: {dag_dir}')
print(f'DAG description file: {dag_file}')
DAG directory: /home/jovyan/tutorials/mandelbrot-dag
DAG description file: /home/jovyan/tutorials/mandelbrot-dag/dagfile.dag
Submit the DAG via the Python bindings
Now that we have written out the DAG description file, we can submit it for execution using the standard Python bindings submit mechanism. The Submit class has a static method which can read a DAG description and generate a corresponding Submit object:
[13]:
dag_submit = htcondor.Submit.from_dag(str(dag_file), {'force': 1})

print(dag_submit)
universe = scheduler
executable = /usr/bin/condor_dagman
getenv = CONDOR_CONFIG,_CONDOR_*,PATH,PYTHONPATH,PERL*,PEGASUS_*,TZ,HOME,USER,LANG,LC_ALL,ASAN_OPTIONS,LSAN_OPTIONS,BEARER_TOKEN,BEARER_TOKEN_FILE
output = /home/jovyan/tutorials/mandelbrot-dag/dagfile.dag.lib.out
error = /home/jovyan/tutorials/mandelbrot-dag/dagfile.dag.lib.err
log = /home/jovyan/tutorials/mandelbrot-dag/dagfile.dag.dagman.log
remove_kill_sig = SIGUSR1
My.OtherJobRemoveRequirements = "DAGManJobId =?= $(cluster)"
My.IsDaemonCore = True
on_exit_remove = (ExitSignal =?= 11 || (ExitCode =!= UNDEFINED && ExitCode >=0 && ExitCode <= 2))
arguments = "-f -l . -Lockfile /home/jovyan/tutorials/mandelbrot-dag/dagfile.dag.lock -Dag /home/jovyan/tutorials/mandelbrot-dag/dagfile.dag -CsdVersion $CondorVersion:' '25.8.2' '2026-04-15' 'BuildID:' 'UW_Python_Wheel_Build' '$ -dagman /usr/bin/condor_dagman -AutoRescue 1 -force"
environment = "_CONDOR_DAGMAN_LOG=/home/jovyan/tutorials/mandelbrot-dag/dagfile.dag.dagman.out _CONDOR_MAX_DAGMAN_LOG=0"
queue
Now we can enter the DAG directory and submit the DAGMan job, which will execute the graph:
[14]:
import os
os.chdir(dag_dir)

schedd = htcondor.Schedd()
cluster_id = schedd.submit(dag_submit).cluster()

print(f"DAGMan job cluster is {cluster_id}")

os.chdir('..')
DAGMan job cluster is 1
Let’s wait for the DAGMan job to complete by reading it’s event log:
[15]:
dag_job_log = f"{dag_file}.dagman.log"
print(f"DAG job log file is {dag_job_log}")
DAG job log file is /home/jovyan/tutorials/mandelbrot-dag/dagfile.dag.dagman.log
[16]:
# read events from the log, waiting forever for the next event
dagman_job_events = htcondor.JobEventLog(str(dag_job_log)).events(None)

# this event stream only contains the events for the DAGMan job itself, not the jobs it submits
for event in dagman_job_events:
    print(event)

    # stop waiting when we see the terminate event
    if event.type is htcondor.JobEventType.JOB_TERMINATED and event.cluster == cluster_id:
        break
000 (001.000.000) 2026-04-16 16:46:56 Job submitted from host: <172.17.0.2:9618?addrs=172.17.0.2-9618&alias=f490c38eb019&noUDP&sock=schedd_16_de02>

001 (001.000.000) 2026-04-16 16:46:59 Job executing on host: <172.17.0.2:9618?addrs=172.17.0.2-9618&alias=f490c38eb019&noUDP&sock=schedd_16_de02>

005 (001.000.000) 2026-04-16 16:47:26 Job terminated.
        (1) Normal termination (return value 0)
                Usr 0 00:00:00, Sys 0 00:00:00  -  Run Remote Usage
                Usr 0 00:00:00, Sys 0 00:00:00  -  Run Local Usage
                Usr 0 00:00:00, Sys 0 00:00:00  -  Total Remote Usage
                Usr 0 00:00:00, Sys 0 00:00:00  -  Total Local Usage
        0  -  Run Bytes Sent By Job
        0  -  Run Bytes Received By Job
        0  -  Total Bytes Sent By Job
        0  -  Total Bytes Received By Job
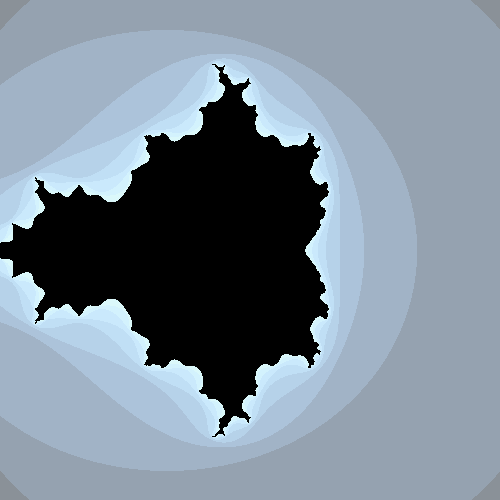
Let’s look at the final image!
[17]:
Image(dag_dir / "mandelbrot.png")
[17]: